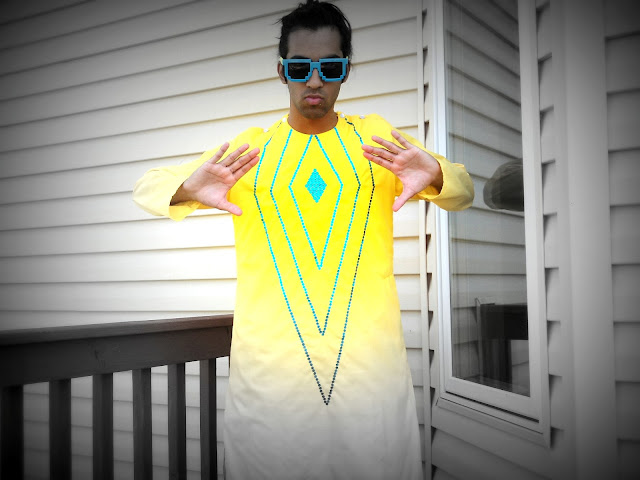
Weddings are the best occasions for beautiful extravagant clothes. My family was invited to a wedding this summer, and I decided to make my own extravagant clothing. Because this wedding was and Indian wedding, I decided to make a kurta, an Indian garment. Following the pattern I took from the kurta my cousin gave me (more HERE), I made this kurta! I pretty pleased with the result.
 |
| Figure 1: Casually standing around with hands in pocket |
NEW DESIGN ELEMENTS: Sequins and Opening
Following my discussion from last time, I needed to add new elements to make this garment my own. Without these elements, the garment would be a direct copy (not okay).
SEQUINS:
I wanted something flashy, and I really wanted to work with sequins and beads. I did a lot of research (surfing the web) to find out how to add sequins and beads. I ran into this following video which shows the Chanel's process for making a couture garment:
http://www.youtube.com/watch?v=lttB10ne37I
In the video, the machinists added the beads/sequins with a hook like tool. I found other videos of people adding sequins to saris using the same method. I later learned that the tool the people were using is called a TAMBOUR HOOK. Basically the hook works like a crochet hook. The artist makes single chains through the garment while adding the beads/sequins in those chains.
I looked around to see what to purchase, and I came across the Clover company which sells a similar hook ("Kantan Couture" Bead Embroidery Tool) and a specialized hoop made for this type of embroidery work. The clover hook is really helpful for beginners because there is a specialized latch that helps guide the process. Also, the Clover hook is larger than tambour hook, which also helps guide the process for beginners. There are youtube videos out there explaining how to use the product. [I should really look into getting sponsored....]
Figure 2 shows the pattern I was playing around with. After figuring the placement of the sequins, I mapped out the pattern and traced it onto the fabric.
 |
| Figure 2: Arrangement of sequins and beads. This helped me figure out the pattern I wanted to add. |
Here's a video of me adding the sequins to this garment (I did not want the sequins to overlap over each other, so I left an empty stitch in between each sequin):
OPENING:
My favorite part about the garment is the opening. Usually kurtas have a placket going down the center front (kind of like a polo shirt). However, I wanted my pattern to be very bold. So, I engineered the opening to be on the shoulder seam (Figure 3).
 |
| Figure 3: The opening is in the shoulder seam. The left picture shows the garment closed. The right picture shows the garment open. |
To engineer this opening, I had to extend the shoulder seams by the size of the button (both front piece and back piece). Then I overlapped the pieces before adding the sleeves (Figure 4). The front and back piece line up over the original seam.
 |
| Figure 4: This view shows overlap. |
DISCUSSION:
I thought I would show the inside of the garment because there are important discussion points.
1) Because of the different type of opening, I needed to add a facing to keep the opening finished.
2) The inside of the front piece (Figure 5) is white because I did the embroidery over two pieces of fabric, white on the bottom and yellow on top. I did this to add more stability to the garment. Originally I added sequins to just the yellow fabric. After adding the first diamond of sequins, I noticed that the fabric was way too wavy. This would not have allowed the middle diamond of beads to stay flat on my chest (bumpy chests: not cool). So I took everything out and restarted with the two layers. The overall piece was less wavy, but it was still not perfectly flat. I think the issue was two fold. First, I was pulling on the string too much. Second, the hoop is too small for the hole design. This is a problem because every time I re-adjusted the hoop, I would stretch the fabric in a different way. To fix the second issue I might need to make my own large hoop.
3) The beads in the center were stable with one layer of fabric (I did a test before this piece). The second layer just added more stability.
4) This only thing I would do differently is line this inside-front so that the stitching would be covered up.
 |
| Figure 5: The inside-front of my kurta. |
And here are some fun pictures for you to enjoy:


No comments:
Post a Comment