Wednesday, July 31, 2013

Rain Jacket


 I'm going to Oxford, UK to study abroad.  Because of the everyone says it only rains in the UK (stereotype), I thought i would be appropriate to make a rain jacket.

This project nearly killed me.  I thought it would be simple because this jacket was essentially just the rub-off sloper I made with a couple easy added elements: pockets and a hood.  Nope; the hood took me days to figure out, even though I did it before, and the plastic material was almost impossible to work with.  This jacket took me an extra week to make.  That's a little embarrassing.  I might not even take the jacket because it's so fragile (sewing the plastic basically just made it like perforated paper).  I'm not happy.

ELEMENTS:
Hood:
The hood was just frustrating.  It took me many appempts and days to get to something I really wanted.  I wanted a hood that covered the neck and still conformed to the head.  I did a bit of research, and the ARCTERYX company made jackets with the hood I desired (figure 2).  My first attempt (trial 1 in figure 1) was just off.  I was not too disapointed because it was my first trial and mistakes were bound to happen.  My second attempt (trial 2) was even more off.  This is when I started to get pissed.  I thought all of the mistakes from the first trial were corrected, but I made the situation worse.  Then I realized that I was going about the hood the wrong way.  I was just going off of the neckline.  However, I didn't realize that I needed to make a BUILT UP neckline.  So in my third attempt I built up the neckline a bit... and it still didn't work.  I was really upset because I still didn't have a good enough hood.  But, what kept me going was that I was going in the right direction.  I needed to build up the neckline more from the center front. In my fourth trial I was still a little off, but the hood was in the shape that I wanted (or close enough anyway).  All I had to do was make a few fitting adjustments (seen with the pins).  But alas, I had a hood that I was satisfied.
Figure 1: The four trials I needed to figure out the hood.  I was not happy throughout this process.
 Looking at the comparison between my hood and Arcteryx's hood (figure 2), I think I needed to add a bit more to the back (make it more scooped) and build up the neck more, but I'm satisfied for the time being.
Figure 2: Comparison of Arcteryx's hood and my hood.

Plastic:
Well, I wanted my jacket to be water-proof.  I was too cheap to buy water-proof fabric, so I just bought vinyl and put it over regular fabric.  This was a big mistake because sewing the vinyl made it unstable.  If I sit the wrong way, or stretch in an odd way, I'm afraid that I might pull the plastic out.
Figure 3: Putting vinyl over fabric
Pockets: 
I really like welt pockets, and I've never made them before, so I thought this was the right time to make them.   Note, I had to put paper over the plastic so that I could top stitch (otherwise the garment would get stuck on the foot).  Also, I had to take everything in place, NOT PIN.  Pinning would make permanent holes.
Figure 4: i had to put paper over the plastic so that I could top stitch.

I thought the pocket it would be a good place to add a little surprise with a pop of color (figure 5). I thought it turned out great!
Figure 5: The pop of color under the pocket flap.  My favorite part about this jacket.
Seam finishes:
I thought I would simplify my life by not adding a lining (the fabric under the plastic is an "underlining").  To finish the seams, I thought I would bind all of the edges.
Figure 6: The edges were bound before I attached them together.  This series made the process go a lot faster.
Vent:
I wanted to add a vent because they are classy.  However, I couldn't think of a way to make a neat vent with out lining . So I decided to line only the vent!  After making the vent, I stitched the lining to the underlining.  This way the vent remained classy and clean.
Figure 7: the vent lining pinned to the underlining.
Zipper shield:
I added a zipper shield so that the zipper would not get caught on my clothes.
Figure 8: Zipper shield under right hand.

RANDOM PICTURES:

Figure 9: The vent, pocket, an hood in action


Sunday, July 14, 2013

Kurta


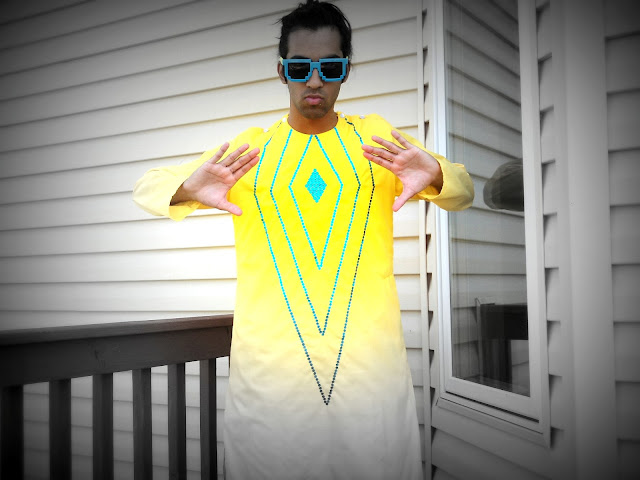
Weddings are the best occasions for beautiful extravagant clothes.  My family was invited to a wedding this summer, and I decided to make my own extravagant clothing.  Because this wedding was and Indian wedding, I decided to make a kurta, an Indian garment.  Following the pattern I took from the kurta my cousin gave me (more HERE), I made this kurta!  I pretty pleased with the result.

Figure 1:  Casually standing around with hands in pocket
I added pockets to this garment for functional reasons.  The pockets are a type of side pocket that is tacked down on both sides of the garment.  I took this idea from the original garment because the pocket lies flat (does not become bulky on one side), yet the pocket contains a lot of space.


NEW DESIGN ELEMENTS: Sequins and Opening
Following my discussion from last time, I needed to add new elements to make this garment my own.  Without these elements, the garment would be a direct copy (not okay).

SEQUINS:
I wanted something flashy, and I really wanted to work with sequins and beads.  I did a lot of research (surfing the web) to find out how to add sequins and beads.  I ran into this following video which shows the Chanel's process for making a couture garment:
http://www.youtube.com/watch?v=lttB10ne37I
In the video, the machinists added the beads/sequins with a hook like tool. I found other videos of people adding sequins to saris using the same method.  I later learned that the tool the people were using is called a TAMBOUR HOOK.  Basically the hook works like a crochet hook.  The artist makes single chains through the garment while adding the beads/sequins in those chains.

I looked around to see what to purchase, and I came across the Clover company which sells a similar hook ("Kantan Couture" Bead Embroidery Tool) and a specialized hoop made for this type of embroidery work.  The clover hook is really helpful for beginners because there is a specialized latch that helps guide the process.  Also, the Clover hook is larger than tambour hook, which also helps guide the process for beginners.  There are youtube videos out there explaining how to use the product.  [I should really look into getting sponsored....]

Figure 2 shows the pattern I was playing around with.  After figuring the placement of the sequins, I mapped out the pattern and traced it onto the fabric.
Figure 2: Arrangement of sequins and beads.  This helped me figure out the pattern I wanted to add.

Here's a video of me adding the sequins to this garment (I did not want the sequins to overlap over each other, so I left an empty stitch in between each sequin):


OPENING:
My favorite part about the garment is the opening. Usually kurtas have a placket going down the center front (kind of like a polo shirt).  However, I wanted my pattern to be very bold.  So, I engineered the opening to be on the shoulder seam (Figure 3).
Figure 3: The opening is in the shoulder seam.  The left picture shows the garment closed.  The right picture shows the garment open. 
To engineer this opening, I had to extend the shoulder seams by the size of the button (both front piece and back piece).  Then I overlapped the pieces before adding the sleeves (Figure 4).  The front and back piece line up over the original seam.
Figure 4:  This view shows overlap.
DISCUSSION:
I thought I would show the inside of the garment because there are important discussion points.
1) Because of the different type of opening, I needed to add a facing to keep the opening finished.
2) The inside of the front piece (Figure 5) is white because I did the embroidery over two pieces of fabric, white on the bottom and yellow on top.  I did this to add more stability to the garment.  Originally I added sequins to just the yellow fabric.  After adding the first diamond of sequins, I noticed that the fabric was way too wavy.  This would not have allowed the middle diamond of beads to stay flat on my chest (bumpy chests: not cool).  So I took everything out and restarted with the two layers.  The overall piece was less wavy, but it was still not perfectly flat.  I think the issue was two fold.  First, I was pulling on the string too much. Second, the hoop is too small for the hole design.  This is a problem because every time I re-adjusted the hoop, I would stretch the fabric in a different way.  To fix the second issue I might need to make my own large hoop.
3) The beads in the center were stable with one layer of fabric (I did a test before this piece).  The second layer just added more stability.
4) This only thing I would do differently is line this inside-front so that the stitching would be covered up.
Figure 5: The inside-front of my kurta.

And here are some fun pictures for you to enjoy:


Tuesday, July 9, 2013

Rub-Off


I have tried pattern drafting in the past.  Every time I tried, I failed because I did not understand the concept of ease or measurement.  While I am currently better at the latter, I am still failing at pattern drafting.  Maybe this is because I did not take a pattern drafting course?  Maybe this is because I am not smart enough to figure it out with the resources out there?  Maybe the resources out there fail at giving a rational for each step?

I do not know why I am failing so much.  All I know is that I HAVE HAD IT, OFFICIALLY! (Detox, Season 5 RuPaul's Drag Race).  I really want to get back to sewing, so I decided to use Rub-Offs.

In his book Fashion Inside Out, Daniel Vosovic talks about how a rub-off is a fashion industry trick.  Basically a rub-off is a pattern copied off of an exiting garment.  Designers do this to speed up the design process.  For example if a designer wants to make a pair of well-fit pants, the designer can just go buy a pair of well-fitting pants and copy the pattern.  

Hold-up: RED FLAG.  That's plagiarism!

Well, designers add their own elements to the pattern.  It's faster because you do not need to draft a base from scratch.  Also, you can not really sue for a copied pattern (sort of... there are a lot of complications).  This aspect is a complicating and frustrating for the fashion industry.  Two companies which went through the court to deal with this problem are Walmart (Walmart v Samara) and Louis Vuitton (red sole).

My rational for "copying" is that I am not making a rub-off to sell; I am making a rub-off to learn about patterns (where ease is added and why) and to speed the process up (I will add my own elements to the pattern).  Is this rational justified?  I'm not sure, but I'm reassured by the fact that at least I'm not selling my garments.  So at least no one can claim that I'm taking someone's money.

Another way I like to think of the rub-off process is by comparing it to what engineers do.  Many engineers take existing technology, dismantle it, and put it back together to learn more about the product.  This helps the engineers come up with better products.  Is it fair?  I'm not too sure.  Comment below about what you think!


THE BEFORE:
My cousin gave me this kurta  (figure 1) as a gift.  Kurtas ("panjabi" in Bengali) are not fitted garments; they are constructed to be over-sized.   This construction technique might exist to add more embroidery.  However, I think kurtas are made over-sized to accommodate for "larger people".  Unfortunately for me, someone with a smaller frame, this means most kurtas make me feel like a walking teepee.  The kurta my cousin gave was the first kurta that actually fit me well.  The extra ease was not bulky.  The sleeves were in the correct place (unlike most kurtas which are extended out). And, most importantly, the back fit like a dream! There there were no extra pleats in the back yet I could move freely without worrying about busting the garment.  This kurta was the best base I could find: it was simple and fit in the right places (sleeves and back).  It was my ticket to a perfect sloper.

 Figure 1: The kurta my cousin gave me.
MAKING THE PATTERN:
Making a rub-off is all about exposing seams.  Two important tricks when exposing seams are marking the center front and center back lines and making sure the garment is flat.  The neckline and arm hole (armscye) is a bit harder to trace.  Some people directly and trace.  Others put paper between a styrofoam block and the garment and then punch holes with a needle along the seam.  I chose a different method: I made slits to the seam and folded in.  I thought this was more accurate than tracing and less time consuming than the styrofoam block.  Any method works because the traced pattern will not be perfect.

Figure 2: Keeping the garment and pattern flat with a pyramid paper weight.

Tracing a the sleeve is also a bit complicated.   First I folded the sleeve in half to expose the seam next to the armpit and made that fold permanent with some pins.  Then I took some paper and made a straight line.  I lined up that line and the top of the sleeeve.  I traced the front (using the slit method described for the arm hole).  Then i flipped the sleeve over, keeping the same fold, lined the straight line with the top, and then traced the bottom.
Figure 3: Working on the sleeve.

I hope this makes sense.  Maybe a video would be better at explaining what I did...


THE TEST:
As I mentioned before, the traced pattern will not be perfect.  The reason for this imperfection is because both sides of a garment are not equal because of mini sewing errors.  Because of this, it is important to test your pattern.  I did this with some scrap fabric, and I am pretty pleased with the pattern.  The sleeves are in the right place and the back fits beautifully (as you can see when I stretch them all the way).
Figure 4: Trial of traced pattern

WHAT I LEARNED:
The most important thing I learned from this process is that the pattern is the same under the arm hole.

Figure 5: The front pattern piece on top of the back pattern piece.  Under the arm hole, everything is the same.
WHAT WILL HAPPEN:
I'm took this pattern and made some of my own garments.  I changed up the design, and clothes that actually fit me.  Those garments will be featured in future posts.